Then its octa-core Snapdragon 888 5G chipset coupled with up to 256GB 16GB RAM combination is sure to give you a lag-free experience. Likewise, its mammoth 6000 mAh battery with 65W Fast Charging would comfortably lead to a day’s battery life. Along the same lines, these devices are proving to be quite an active player in custom development. Right from unlocking the bootloader to trying out a plethora of mods, the possibilities stand endless. You could even gain administrative privileges by rooting it via Magisk. And in this guide, we will show you how to do just that. So without further ado, let’s check out the steps to unlock the bootloader and root the Asus ROG Phone 5/Pro/Ultimate device via Magisk.
Benefits and Risks of Unlocked Bootloader and Root
Before you could try out any of the modifications on your device, you need to unlock the bootloader. Doing so shall allow you to flash custom ROMs, a custom recovery like TWRP, or even gain access to the system partition. The latter will then allow you to flash mods such as magisk Modules, Substratum Themes, Xposed Framework, Viper4Android, etc. However, on the flip side, these tweaks do bring in some risks as well. Upon rooting the device, the SafetyNet will be tripped [Fix: How to Pass Magisk SafetyNet on Rooted Android]. This would result in the inability to use banking apps or watch Netlfix in HD [Fix: How to Watch Netflix in HD on Rooted Devices with Widevine L1 Support]. So if all these are well and good, then let’s proceed with the steps to unlock the bootloader and root the Asus ROG Phone 5/Pro/Ultimate device via Magisk. Follow along.
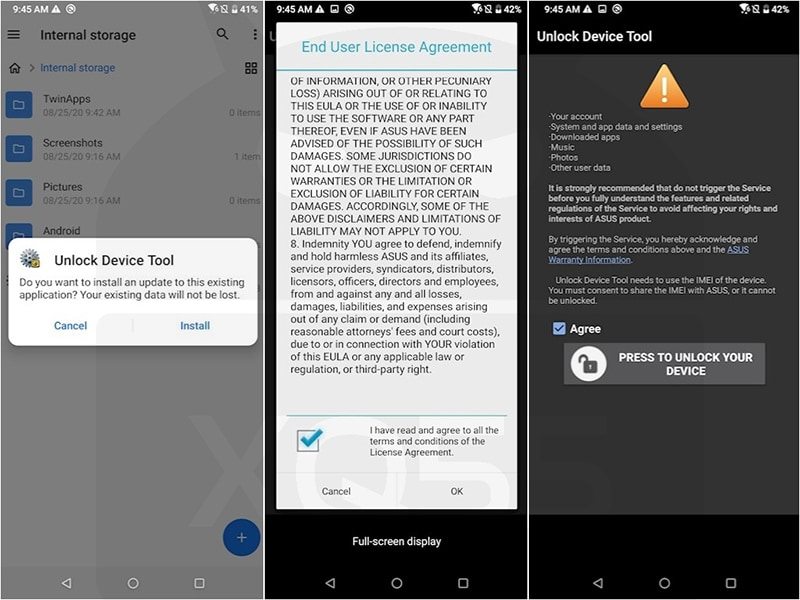
Unlock Bootloader on Asus ROG Phone 5/Pro/Ultimate
Droidwin and its members wouldn’t be held responsible in case of a thermonuclear war, your alarm doesn’t wake you up, or if anything happens to your device and data by performing the below steps. So with this, you have successfully unlocked the bootloader on your Asus ROG Phone 5/Pro/Ultimate device, let’s now check out the steps to root it.
How to Root Asus ROG Phone 5/Pro/Ultimate via Magisk
The below instructions are listed under separate sections for ease of understanding. Make sure to follow in the exact same sequence as mentioned.
STEP 1: Install Android SDK
First and foremost, you will have to install the Android SDK Platform Tools on your PC. This is the official ADB and Fastboot binary provided by Google and is the only recommended one. So download it and then extract it to any convenient location on your PC. Doing so will give you the platform-tools folder, which will be used throughout this guide.
STEP 2: Enable USB Debugging and OEM Unlocking
Next up, you will also have to enable USB Debugging and OEM Unlocking on your device. The former will make your device recognizable by the PC in ADB mode. This will then allow you to boot your device to Fastboot Mode. So head over to Settings > About Phone > Tap on Build Number 7 times > Go back to Settings > System > Advanced > Developer Options > Enable USB Debugging.
STEP 3: Download Asus ROG Phone 5/Pro/Ultimate Stock Firmware
The below two steps will now list out the instructions to download the stock firmware and then extract the stock boot.img from the payload.bin file. Currently, I am using Asus ROG Phone 5 Version CN-18.0840.2104.55, hence I have already performed both these steps. So if you are also running the same firmware version and have the same device, then you may directly download the extracted stock boot.img file from here and skip the next two steps. Once downloaded, directly move over to the “Patch Stock Boot.img via Magisk” section. Download for Asus ROG Phone 5: Stock Boot.img Version CN-18.0840.2104.55
Or manually download the firmware file for your device from the below links. Make sure to download the one that corresponds to your current build number. That is, the firmware version number should be the same as the one that is currently installed on your device.
ROG Phone 5: Stock Firmware CollectionROG Phone 5 Pro: Stock Firmware CollectionROG Phone 5 Ultimate: Stock Firmware Collection
STEP 4: Extract Stock Boot.img from Asus ROG Phone 5/Pro/Ultimate Firmware
STEP 5: Patch Asus ROG Phone 5/Pro/Ultimate Stock Boot.img via Magisk
STEP 6: Boot to Fastboot Mode
STEP 7: Flash Magisk Patched Boot.img and Root Asus ROG Phone 5/Pro/Ultimate
That’s it. These were the steps to unlock the bootloader and root Asus ROG Phone 5/Pro/Ultimate via Magisk. If you have any queries concerning the aforementioned steps, do let us know in the comments. We will get back to you with a solution at the earliest.
About Chief Editor


