But the hardware components usually took some time in getting updates. By hardware, it was usually the Qualcomm, MediaTek, and Snapdragon processors that needed to be updated. And this took quite a lot of time in getting updated. Until and unless this hardware was updated, Google was unable to do anything. But with the launch of Project Treble, the Silicon Valley giants separated the hardware and software components. As a result, it was no longer needed to update the hardware components. All that was required was the updation of Android OS. The biggest benefit in this regard was the Project Treble devices. This is because these devices supported the Generic System Images to be flashed to their devices. So even if you don’t own a Pixel handset, you could still try out the newer Android build the same day. This is possible as Google released the Android firmware for Pixel and the GSI image for the same ROM concurrently. And today, we will be sharing with you the steps to install the Android 11 GSI image on any Project Treble device. So without further ado, let us begin with the guide.
How to Go Back to Stock ROM from GSI ROM (All Android Devices)Flash Custom ROM After Wiping Internal Storage Without SD Card or OTGHow to Extract OZIP Realme Stock ROM (Firmware)How to Revert to Stock ROM from GSI ROM (Universal Guide)
Requirements
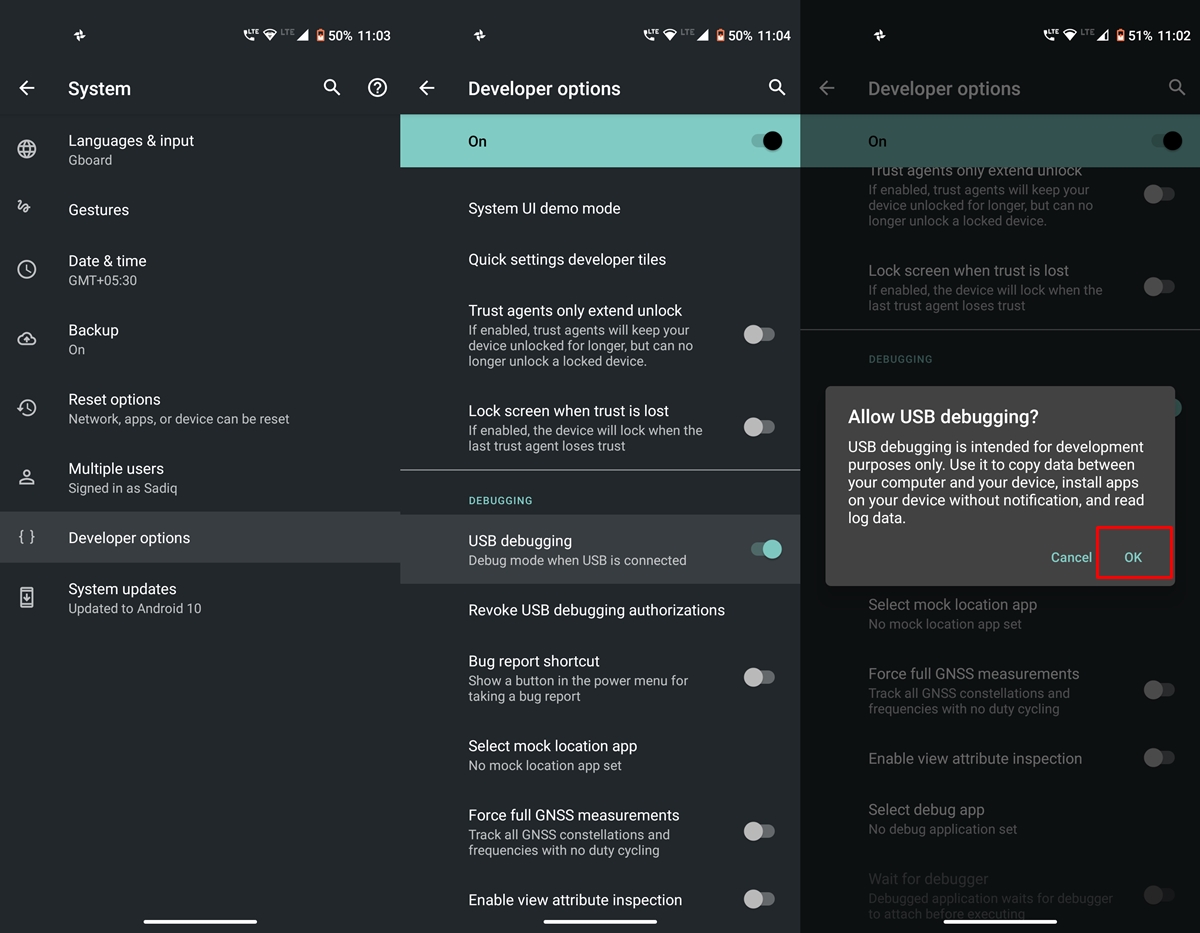
Your device should be Project Treble compatible. To check for the same, download the Treble Info application from Play Store.Next, your device should also be having at least Android 9.0 out of the box.Also, Enable Developer Options and USB Debugging on your device. The same could be done by heading over to Settings > System > About Phone > tap on Build Number 7 times > Go back to System > You will see Developer Options > Enable the USB Debugging toggle. Don’t Miss: Enable USB Debugging on a Broken Android Device’s Screen? Here’s a WorkaroundUSB Debugging on AndroidMoreover, the bootloader should also be unlocked.Likewise, make sure to have a complete backup of your entire device. Installing Android 11 requires you to wipe your data partition. So create a backup beforehand.Finally, check your device’s CPU architecture from the Treble Info app. It will be either x86 or ARM64.Once you meet all the above requirements, you could now easily download and install Android 11 onto your GSI supported project treble devices.
Download Android 11 GSI File
You could now download the Android 11 GSI file for your Project Treble devices from the below link:
Google GSI Images
ARM64+GMS: DOWNLOAD LINKARM64: DOWNLOAD LINKx86+GMS: DOWNLOAD LINKx86_64: DOWNLOAD LINK
PHH TREBLE GSI Phh-Treble v300.a (Based on AOSP 11.0): Download Link
Supported Devices:
— Husson Pierre-Hugues (@phhusson) September 22, 2020 Allview V3 Viper ASUS ROG Phone 3 ASUS ZenFone 6 ASUS ZenFone Max M2 Chuwi Hi9 Pro F(x)tec Pro 1 Honor View 10 Huawei Mate 9 Infinity Smart 2 K-TOUCH I9 Motorola Moto E5 Motorola One Action Nokia 4.2 Nubia Red Magic 5G OnePlus 6 Razer Phone Realme X2 Pro Redmi Go Samsung Galaxy A51 Samsung Galaxy S9+ Xiaomi Mi 9 Xiaomi Mi Mix 3 Xiaomi Qin 2 pro Unihertz Titan
Fix Magisk Module Bootloop without TWRP RecoveryHow to Fix TWRP Error 20 GApps after flashing LineageOSFix Mi Account Authorization | Unbrick Xiaomi | EDL ModeHow to Fix Error: Cannot load recovery.img
Warning
This build is unstable and some of the features are yet to be functional. So it is not recommended to use this ROM as a daily driver.Next up, in case of a nuclear attack, your house getting on fire or your device getting bricked or in bootloop, Droidwin or any of its members will not be held responsible. Proceed ahead at your own risk.
How to Install Android 11 on GSI supported Android devices
Well, there are two different ways through which you could install Android 11 on your device. The first involves the use of Android SDK and Platform Tools whereas the second one is possible via TWRP Recovery. We will be discussing both the methods below, beginning with the former.
Method 1: Installing Android 11 via ADB and Fastboot Commands
With that, you should now be successfully booted to Android 11. Enjoy! So, let us now turn our attention towards installing Android 11 via TWRP Recovery. Note for STEP 6: If that command doesn’t work out for you, then try:
Don’t Miss: TWRP Recovery 101: Guides, Tutorials, Tips, and Error Fixes
Method 2: Using TWRP Recovery
Well, to be frank, using ADB and Fastboot Commands does require some efforts. These include setting up platform-tools, requiring USB cable, a PC, entering various commands, etc. That is why it is always recommended to install Android 11 using a TWRP Recovery if your device supports one. With that said, here is how you could flash Android 11 using a custom recovery like TWRP. On that note, also check out the steps to install TWRP Recovery on any Android device.
How to Install OTA Updates in Rooted Android DeviceHow to Install Substratum Themes on any Android (Oreo 8.0 and above)Permanently Install TWRP without TWRP ZIP File (only using TWRP.img file)Root Android Devices Without TWRP Recovery
Steps to be followed
Download the permissiver v5 flashable zip file and transfer it to your Android device’s SD card or to the pen drive (if your device supports OTG). This file is needed to change your kernel from Enforcing to Permissive. In general, this file is mostly needed if you flash Erfan’s GSI builds. But we have also seen some users could only boot the Android’s official GSI builds only after flashing this file. If they don’t flash this file, Android 11 won’t boot up and they will end up in a bootloop. Furthermore, transfer the system.img file from the Android 11 GSI file over to your device. Also, transfer the vbmeta.img file to your device. Make sure to transfer them onto your SD Card. If your device doesn’t have an SD Card, then transfer it to your OTG supported external SUB Drive like Pen Drive. Then when you boot to TWRP Recovery, first of all, head over to Mount and select your USB OTG option. Then hit the Mount button situated at the bottom. The reason why we are not allowing you to transfer the files to Internal Storage as we will be wiping that partition. So with that, we conclude the guide on how to install Android 11 on any Project Treble compatible Android device. However, if you face any queries executing the above steps, drop-in your queries in the comments section below.
[GUIDE] Flash ROMs/Magisk/TWRP/Kernels on A/B Partition DevicesEverything About Magisk- Manager, Modules, and MoreBest Magisk Modules of 2020 [PART-1][3 METHODS] Unroot any Android Device-Uninstall Magisk
About Chief Editor